QuickBooks Install Diagnostic tool | How to Install and Fix Errors?
What is QuickBooks Install Diagnostic Tools?
QuickBooks application has some main features that use the core components of Microsoft. If any components do not function due to any possible reason then QuickBooks encounters errors that can’t be undone manually by anyone. The diagnostic tool recognizes the errors associated with .NET Framework, C++, MSXML, along with the QuickBooks issues.
With the introduction of this tool, users can easily Install the diagnostic tool QuickBooks to fix many errors efficiently. Now they do not have to rely on other tools that have to be downloaded separately and that too at a high cost.
Before this tool, users had to fix the QBs errors manually in which many difficulties and more complex errors would pop up. But now, the situation has evolved fully.
Specifications Needed to Install Diagnostic Tool For QuickBooks
Before we move to the section where we will explain to you the topics like- Install diagnostic tool QuickBooks, QuickBooks install diagnostic tool executable file download, and QuickBooks desktop installs the diagnostic tool, let’s first understand the specifications required for installing this repairing tool.
- Microsoft Visual C++ Redistributable Package
- Microsoft .NET Framework
Check out the list below containing the errors and issues that can be repaired by the repairing tool. Have a look:
- QuickBooks Error code 1603
- QuickBooks Error Code 1935
- Errors associated with damaged Microsoft.NET Framework
- QuickBooks Error 1904
- QB Error Code 1402
- C++
- QuickBooks unrecoverable errors.
- QuickBooks has stopped working error
Various Issues and Problems Faced While Installing QuickBooks Software
![]()
When this error occurs, it affects your system. To help you identify the errors faced during installation we have listed a few symptoms below:
- There is damage to the MSXML component.
- QuickBooks starts freezing.
- QBs stop functioning properly.
- Windows pop-up messages of .NET Framework error.
- Errors relatable to C++ programming flash on the screen.
- The keyboard and mouse stop working.
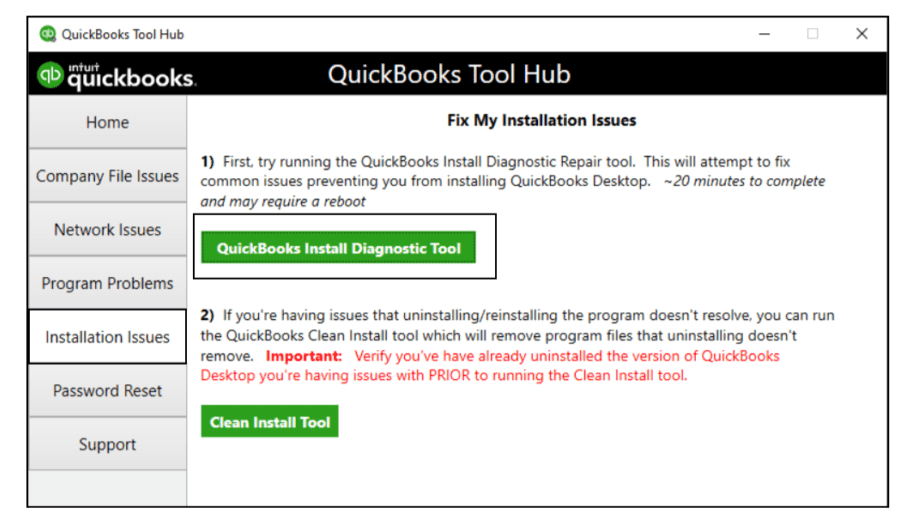
Point to Note While Using “QuickBooks Install Diagnostic Tool”
- After downloading the tool, you have to close all the programs in the background.
- This tool can detect and fix errors automatically. In some cases only, you have to reboot the PC.
- Many times, when users run this tool, they are prompted to register/reactivate the QBs desktop.
- After using the tool, sometimes you may see a message on the screen stating – “No Errors were Detected” and you start thinking that the software has no error but it simply means that the QuickBooks Diagnostic Tool is unable to identify the error.
Usage of Diagnostic Tool for QuickBooks: Tabs of the Tools Explained
We have explained the concept and why you need this repairing tool to fix installation errors in QBs. QuickBooks Install Diagnostic Tools scans an error file that needs the fixation to repair the error. Ket’s learn about the factors where the scan is applied.
The three main base components where the QBs installation error can take place are:
- Connection Tab
- Firewall Setting
- Network Connection
After initiating a scan procedure, this tool will recognize the error and fix it from the system automatically.
Diagnose Connection Tab

This tab assists users to observe the system in order to repair the error. Here users can make the company file data accessible from their system whether it is Multi-user mode or single user. Users can perform a scan on the complete system.
Firewall Status
This tab contains all the instructions related to the Firewall. Sometimes, the firewall on your system does not allow you to install any new application leading to errors during the installation process. QuickBooks Install Diagnostic Tools automatically scans and fixes the error in Firewall.
Test your Connectivity
Most of the errors in QuickBooks occurs due to issue in the network. This tab helps you to check the computer’s connectivity. If you need to test the connectivity then tap on that tab which is beside the QBs Company file. The tool will automatically fix if there is any problem with network connectivity.
You should use a Linux system only when you establish a good network connectivity setup. First, choose that option and then change the hosting server check the dialogue box.
Download and Install Diagnostic Tool for QuickBooks
There is no complicated process in downloading this repairing tool and even new QBs users can also install it by executing the steps we have mentioned below. The QuickBooks install diagnostic tool exe download is capable to repair all the errors you encounter while installing the software.
Downloading Steps for QuickBooks Install Diagnostic Tools:
- Firstly, visit Intuit.com and Download QuickBooks.
- Choose your location in order to save the file.
- It is better to save the file on the desktop to access it easily.
Installing Steps for QuickBooks Install Diagnostic Tools
- After you have saved the file, now find the “QBInstall_tool_v2.exe” on your system.
- Close all the running apps.
- Tap twice on the “QBInstall_tool_v2.exe file.”
- Run it.
- Step by step, complete the instructions popping on your screen.
- Then, “Agree to the terms and conditions.”
- Restart your PC to complete the procedure of installation.
Now that you’ve installed the diagnostic tool successfully on your system, it is time to learn how the tool works to fix the errors that occur in the software QuickBooks. In the next section, you will read the proper process to use this repair tool in an efficient manner.
How to Run QuickBooks Install Diagnostic Tools?
Whenever you face any installation/update error in the QBs then QuickBooks Diagnostic tool will come to your mind. Let’s learn how to run the QuickBooks Install Diagnostic Tool to resolve all installation errors.
- First of all, reach out to the QBs Diagnostic Tool.
- If you are unable to find the tool, go to the “Start” and then tap on the “Search” box.
- Write “QuickBooks” in the search box and hit “Enter.”
- Now, a fresh page will come on the screen, navigate the cursor to the QuickBooks Install Diagnostic Tool and tap on it to access.
- After you open the tool, it will begin to scan the error to fix it.
- This process will get finished in a few minutes only.
- After the tool has finished the diagnosis process, you need to “Restart” your system and check that all components for QBs are updated.
This is how you can run this tool, to detect various errors in QBs and fix them automatically without much hassle. Now, let’s move on to the section where we will be explaining the strategies used by users when this tool could not fix some errors.
Methods Used by Users If QuickBooks Diagnostic Tool could not Repair QuickBooks Installation Issues
Although we are sure that this tool is efficient to fix all kinds of installation and update errors, just for precaution, we are explaining the ways used by users to fix the errors if QuickBooks Diagnostic Tool fails to repair QuickBooks errors. Have a look:
Uninstall and Reinstall the QuickBooks Desktop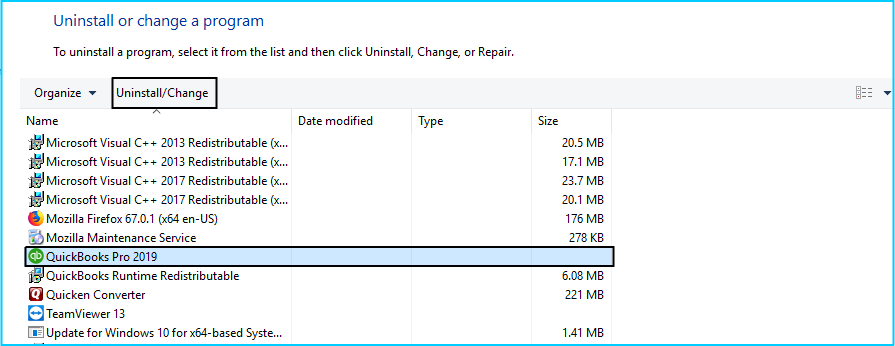
This is the most straightforward solution that you all must try before implementing other methods to fix the installation errors. If you want to resolve errors without going into many technicalities then you must try this solution. This method works because when you uninstall the QBs desktop, the issues also went in the trash. And after installing it again the error won’t trouble you in the freshly installed software.
Selective Start-Up Mode
If the error is a bit stubborn and could not be repaired after reinstalling the software then using it in the Selective Start-up mode could be the best way to get the error fixed.
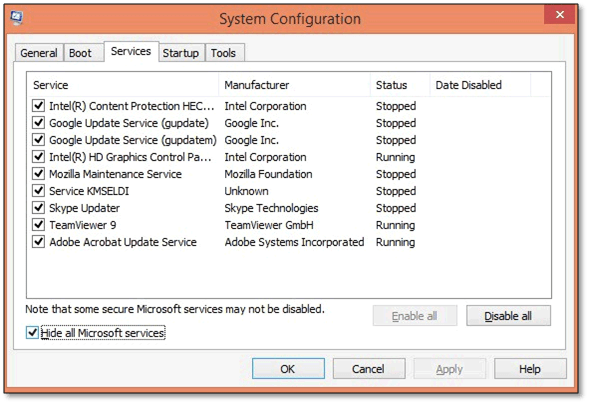
Follow these steps explained below:
- Type the “Run” command after clicking on the “Start.”
- Write “MSConfig.” Hit OK.
- Choose “Selective startup” inside the “General” tab, then choose “Load system services.”
- Select “Services.”
- Tick “Hide all Microsoft services” in order to cease all.
- Pick to Clear “Hide all MS services” in the checkbox.
- Tick the “List of services” and select Window Installer. Hit OK.
- Restart the system configuration first, and Restart the PC.
- Now reinstall QuickBooks using a clean installation process. Now, the system would be restored in Normal Configuration.
Topic Participants
micky john